
- What is guided implant surgery
- Cone-beam CT
- Implant planning software
- Surgical Template
- Surgery
- Surgical template drilling mechanism
What is guided implant surgery
Guided implant surgery uses patient’s CT images to plan implant surgery through computer software. Conventional implant planning via panoramic x-ray images has its limitations as precise execution according to the surgery plan is often difficult. However, guided implant surgery can be executed accurately and precisely as planned. For guided implant surgery a customized surgical template and a specialized surgery tool kit is needed.
Guided implant surgery requires the following tools:
- Medical or Cone-beam CT
- Implant planning software
- Guided implant surgery drill kit
- Custom surgical template
Guided implant surgery follows the following procedures:
- CT Scan
- Planning with Software
- Order Surgical Template
- Sugery
Cone-beam CT
Figure 2. Cone Beam CT

 Cone-beam CT is a specialized x-ray equipment that scans the patient in three-dimension. By using Cone-beam CT along with proper software, a precise and accurate examination of the patient, with realistic visuals, can be achieved.
We can offer you Advantage beyond imaging
Implant planning software
Cone-beam CT produces images in DICOM format, and an implant planning software reads these DICOM files and reconstructs them in two-dimensional or three-dimensional images. These softwares provide various tools for implant planning, therefore, the user can refer to the anatomic structure of the patient and plan a safe surgery.
We can offer you Advantage beyond imaging
Figure 3. Implant planning software
Surgical Template

Figure 3. Implant planning software
Surgical template is an equipment that holds the surgical planning information. In general, it is in the shape of an orthodontic splint, and worn by the patient during surgery. On the surgical template, small metal sleeves are inserted in place, which guides the drilling and implant direction. It is essential for the surgical template to be fabricated to perfectly fit the patient. Several manufactures provide surgical template fabrication service along with implant planning software. Upon sending the planning data made with the software back to the manufacturer, the manufacturer will use the data to fabricate a customized surgical template and have it delivered.
We can offer you Advantage beyond imaging
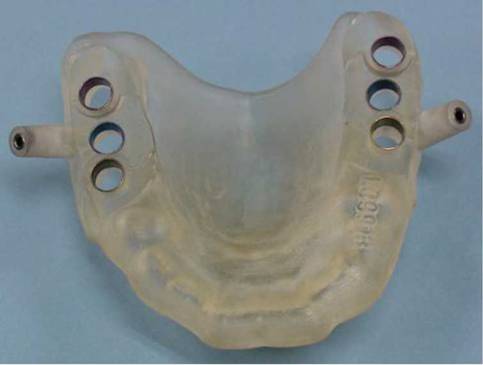
Figure 4. Surgical template; 6 sleeves guide the implant drilling, 2 sleeves for the anchor pin. Anchor pins are use to firmly place the surgical template in the patient's oral cavity.
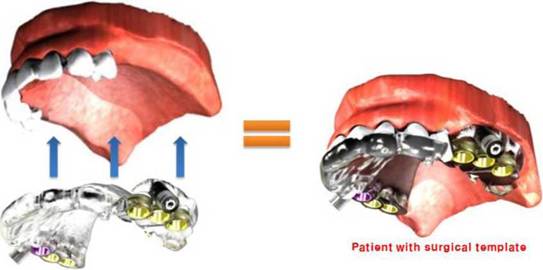
Figure 5. Surgical template placed in the patient's oral cavity
- Endoscope navigation for brain surgery using virtual endoscope
- Virtual endoscope and endoscope registration methods
- Virtual endoscope registration technology using stereo endoscope
- Medical image registration technology using Stereo endoscope
To use a surgical template for guided surgery, a special drill kit must be used. Surgical templates and implants vary from manufacturer, and various guided surgery kits are available on the market. Therefore, the manufacturer must confirm which surgery kit to be used with each surgical template.
Table 1. Component manufacturers for Guide Implant Surgery
| Guided Surgery Kit | Manufacturer | Product |
| Cybermed | In2Guide™ | |
| Nobel Biocare | NobelGuide™ | |
| Biomet 3i | Navigator™ | |
| Straumann | Guided Surgery | |
| Astra | Facilitate™ | |
| Densplay | ExpertEase™ | |
| Materialise | SAFE SurgiGuide Kit | |
| Planning Software | Cybermed | In2Guide™ |
| Nobel Biocare | Procera | |
| Materialise | Simplant | |
| Cybermed | In2Guide™ | |
| Surgical Template | Nobel Biocare | NobelGuide™ |
| Materialise | SurgiGuide |
In general, surgery kits are composed of the following parts. Table 2.
General components of guided implant surgery kit
| Anchor Pin/Anchor Drill | 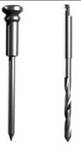 |
Ensures the surgical template is firmly fixed to the oral cavity. Drilling is done with the Anchor Drill then Anchor Pin is inserted to place the surgical template. |
| Tissue Punch | Used to remove tissue during flapless implant surgery. | |
| Drill Guide | Connects to the sleeve and guides the drill into the planned angle and direction. There are several drill guides to accommodate different drill sizes. | |
| Drill |  |
Guided by the Drill guide, a drill has a self-stoper allowing the drill depth to be controlled |

Anchor pin are drilled into the bone to prevent movement of the surgical template during surgery.

3^ 6. Surgical Template firmly fixed by the Anchor Pin
Surgery
Once the Surgery kit and surgical template is ready, the surgery procedure is as follows. The drilling sequence is shown with an implant 4.0mm. (^Drilling sequence may vary from case to case)
Table 3. Guided implant surgery procedure
 |
Surgical template preparation
|
 |
Soft tissue removal
|
 |
Drilling
|
 |
Implant installation
|
 |
Attach provisional restoration
|
Surgical template drilling mechanism
As described above, upon surgery planning with an implant planning software, a surgical template is fabricated based on the planning. The following figure shows how the drilling direction and depth is applied.
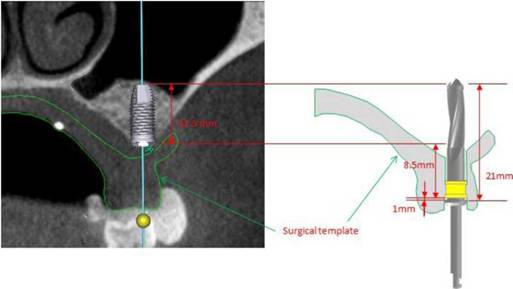
Figure 7. Deciding the sleeve position using a 5mm implant and 21mm drill
In the figure above, the left image shows a plan for an 11.5mm implant to be placed in the 36 tooth region. If a 21mm drill is used, the sleeve is placed 8.5mm above bone level. The leftover 1mm is the thickness of the drill guide; therefore, drilling is done precisely to the length of the implant.


"Your perfect smile, gives us reason to smile"
Contact us now to schedule an appointment.